Tachograph Retrofit The steps for a successful tachograph replacement


First - Please check which tachograph/KITAS can or cannot be retrofitted?

Choose from the list below:

Year : < 1998

Tachograph age: > 25 years

Analog tachographs equipped with a mechanical motion sensor

The Mobility Package legislation requires smart electrical motion sensors. A retrofit to the DTCO 4.1 is therefore not possible. All tachographs up to and including TCO 1314 cannot be converted to a DTCO 4.1

Analog tachographs equipped with an electric motion sensor

Caution

  • There is no legally approved conversion method for this. The following is just a piece of advice.
  • Installation instructions must be obtained from the respective vehicle manufacturer

Materials Needed

  • Continental/ VDO E-Tacho 24V RD 125KMH CAN120 LT. WT+T (1323-030103000523) - shape = round
  • Universal DTCO 4.1 Kit (2910003214600), 12/24V ADR-Z2 120Ω
  • KITAS cable, 8500mm (most common length)
  • KITAS 4-sensor (for shaft lengths, see KITAS page), 2185-xxxxxyyyyy
  • Y-Wire harness universal A with CAN link

Smart tachographs in 'non-smart' vehicles

Vehicles equipped with an analogue tachograph (provided they are not K-Line) are not designed to extract information from the tachograph and do not have a CAN data bus. The standard universal tachograph with the standard configuration is sufficient for this.

Instructions

---in progress---

Year of construction : up to and including 2006

Tachograph age: > 20 years

Modular tachographs equipped with a mechanical motion sensor, K-Line or ADR Z1

  • The Mobility Package legislation requires smart electrical motion sensors. A retrofit to the DTCO 4.1 is therefore not possible. Tachographs up to and including the TCO 1314 cannot be converted to a DTCO 4.1.
  • K-Line has been phased out for quite some time. In vehicles where the dashboard obtains its information via the K-Line, the tachograph cannot be replaced by a DTCO 4.1.
  • ADR zone 1 MTCO tachographs cannot be converted to DTCO 4.1 tachographs for security reasons.

Modular tachographs equipped with an electric motion sensor

Caution

There is no legally approved conversion method. The following is just a piece of advice.

Materials Needed

  • Universal DTCO 4.1 Kit (2910003214600)
  • KITAS 4 sensor (for sizes, see KITAS page)

Smart tachographs in 'non-smart' vehicles

Vehicles equipped with a modular tachograph (if without K-Line) are not designed to extract information from the tachograph and do not have a CAN data bus. The standard universal tachograph is sufficient for this.

Instructions:

  1. Replace the current KITAS sensor with the correct KITAS 4 sensor.
  2. Remove the MTCO and replace it with the indicated Universal DTCO 4.1 tachograph.
  3. The tachograph does not need to be programmed with vehicle-specific parameters (CAN communication was not applicable to the MTCO).
  4. Install and test the DSRC antenna properly (see DSRC Installation Wizard). The DSRC module is internal.
  5. Calibrate the vehicle according to guidelines of the RDW. You should also check the MTCO for tampering.

Special instructions / Possibilities regarding different vehicle brands

Mercedes-Benz ACTROS, AXOR, ATEGO and ECONIC

Until recently, it was possible to replace an installed MTCO with a DTCO in the above models.

To make the retrofit possible, the instrument cluster had to be modified by Mercedes software.

The required software is no longer offered, which means that a retrofit with the above-mentioned models - equipped with an MTCO - is no longer possible.

Note: For Mercedes-Benz Actros vehicles manufactured from 2008 onwards and already equipped with a DTCO tachograph, the existing methods can be retrofitted to a Gen2v2 DTCO tachograph.

DTCO 1.0 to DTCO 2.0

When retrofitting these tachographs to the DTCO 4.1, two possibilities must be taken into account.

1. If vehicle type, brand and year of manufacture are not yet known in the backend - Standard Universal Programming

In this case, the 'Standard Universal Programming' procedure will be chosen. Here you need to extract the legal, TCO and CAN parameters from the old tachograph. Then you program the new tachograph with a static vehicle file and supplement it with the imported parameters of the old tachograph.

2. If vehicle type, brand and year of manufacture are known in the backend - Flexible Universal Programming

If a certain type of vehicle has been retrofitted somewhere in Europe, to a DTCO 4.1 with Flexible Universal Programming, the configuration file is retrieved and programmed directly into the DTCO 4.1.

DTCO 2.0a to DTCO 3.0a

Except for 300 models (throughout Europe), the first DTCO 2.0 was the 2.0a. From these tachographs onwards, the parameters are standardised. For these tachographs, only the following applies: Flexible Universal Programming

New tachograph is an OE tachograph (regardless of brand)

Regardless of which generation of tachograph was in the vehicle - only the legal, TCO and CAN parameters will be transferred to the new OE tachograph. Please note that the CAN settings are included and may differ from the actual new installation.

For these tachographs, only the following applies: Standard Universal Programming (OE part)

Stoneridge or any other brand

Upcoming developments for the Workshop Tab:

  • SW 4.11 - Updating the external Stoneridge DSRC module
  • Q3/Q4 - Programming Universal Gen2v2 Stoneridge Tachographs

The two best-known tachograph brands are VDO and Stoneridge. A retrofit strikes at the heart of the tachograph, the so-called firmware. It often contains "protected" technical data that is not accessible to third parties. If, in the event of a retrofit, you have to switch from one brand to another, it can be more difficult to specify exactly what needs to be done. If you are in possession of VDO workshop equipment, you should take the following into account for the time being:

  • Original Tachograph = OE VDO DTCO

    Replacement Tachograph = OE or Universal Stoneridge SE 5000 R8.1 (or EFAS/Bosch/Intellic)

    Remark = The replacement Stoneridge SE5000 R8.1 must be pre-programmed with the vehicle parameters.

    "Blank" universal Stoneridge tachographs are not supported for the time being (expectation: from Q3/Q4 2024)

  • Original Tachograph = OE Stoneridge Tachograph (or EFAS/Bosch/Intellic)

    Replacement Tachograph =OE or Universal VDO DTCO 4.1

    Remark = The replacement DTCO must be pre-programmed with vehicle-specific parameters.

    In the case of a "blank" universal DTCO, it is necessary to check whether there is a configuration file for the vehicle in question (retrofit procedure B)

  • Original Tachograph = OE Stoneridge Tachograph (or EFAS/Bosch/Intellic)

    Replacement Tachograph = OE or Universal Stoneridge SE 5000 R8.0 (or EFAS)

    Remark = The replacement Stoneridge SE5000 R8.1 must be pre-programmed with the vehicle parameters.

    "Blank" universal Stoneridge tachographs are not supported for the time being (expectation: from Q3/Q4 2024)


DTCO 4.0(e) - Flexible Universal Programming

The DTCO 4.1 architecture is an extension of the DTCO 4.0 architecture.

For these tachographs, only the following applies: Flexible Universal Programming

New tachograph is an OE tachograph (regardless of brand)

Only the legal, TCO and CAN parameters will be transferred to the new OE tachograph. Please note that the CAN settings are included and may differ from the actual new installation.

For these tachographs, only the following applies: Standard Universal Programming (OE part)

Stoneridge and other brands

Upcoming developments Workshop Tab:

  • SW 4.11 - Updating the external Stoneridge DSRC module
  • Q3/Q4 - Programming Universal Gen2v2 Stoneridge Tachographs

The two best-known tachograph brands are VDO and Stoneridge. Procedures for other brands, such as EFAS/intellic are not discussed here and are often similar to the procedures that also apply to Stoneridge. A retrofit goes to the heart of the tachograph, the firmware. These often contain "protected" technical data that are not accessible to third parties, which means that in the event of a retrofit from one brand to another, it is not always possible to indicate in advance exactly what needs to be done.

The following procedures apply to owners of VDO workshop equipment:

  • Original Tachograph = OE VDO DTCO

    Replacement Tachograph = OE or Universal Stoneridge SE 5000 R8.1 (or EFAS/Bosch/Intellic)

    Remark = The replacement Stoneridge SE5000 R8.1 must be pre-programmed with the vehicle parameters.

    "Blank" universal Stoneridge tachographs are not supported for the time being (expectation: from Q3/Q4 2024)

  • Original Tachograph = OE Stoneridge Tachograph (or EFAS/Bosch/Intellic)

    Replacement Tachograph = OE or Universal VDO DTCO 4.1

    Remark = The replacement DTCO must be pre-programmed with vehicle-specific parameters.

    In the case of a "blank" universal DTCO, it is necessary to check whether there is a configuration file for the vehicle in question (retrofit procedure: Standard Universal Programming)

  • Original Tachograph = OE Stoneridge Tachograph (or EFAS/Bosch/Intellic)

    Replacement Tachograph = OE or Universal Stoneridge SE 5000 R8.0 (or EFAS)

    Remark = The replacement Stoneridge SE5000 R8.1 must be pre-programmed with the vehicle parameters.

    "Blank" universal Stoneridge tachographs are not supported for the time being (expectation: from Q3/Q4 2024)

KITAS Mechanical Sensors

The Mobility Package regulation (Annex 1Cv2) requires the presence of smart electrical KITAS 4 sensors. KITAS 4 sensors are therefore not available in a mechanical version and vehicles equipped with mechanically driven motion sensors cannot be converted according to the Mobility Package guidelines.

Overview of mechanical KITAS sensors

Vehicles with these sensors cannot be retrofitted.

  • 2171-20002611 / 2171-20002610 - KITAS2+ length=136mm with 1.2mm washer
  • 2171-01000010 - KITAS2+ M22×1.5 (Female)
  • 2171-02000010 - KITAS2+ M22×1.5 (Male)
  • 2171-03000010 - KITAS2+ 7/8"×18TPI (Female)
  • 2171-07010110 - KITAS2+ M18×1,5; 4 Imp./U. (Female)
  • 2171-08010010 - KITAS2+ M18×1,5 rechts; 8 Imp./U. (Female)
  • 2171-20002615 - KITAS2+ length=136mm with 1.2mm washer
  • 2171-32210440 - DAG KITAS2+ 1:1 4,40m
  • 2171-32240410 - DAG KITAS2+ 4:1 4,10m
  • 2171-32810226 - DAG KITAS2+ 1:1 3,90m
  • 2171-32810390 - DAG KITAS2+ 1:1 3,90m
  • 2171-32840226 - DAG KITAS2+ 4:1 3,60m
  • 2171-32840360 - DAG KITAS2+ 4:1 3,60m
  • 2171-0100001010 - KITAS2+ Training M22×1,5 (Female)

KITAS 4 Sensors

Replacement (valid) KITAS sensors can be found via the Workshop Configurator :

  • Serial number can only be searched from 2012 onwards (older?, see below under 'Unknown')
  • You can always search by article number.

KITAS Unknown

If it is not known which KITAS the vehicle is equipped with (or for some reason), it is important that you measure the shaft length. This is length L, excluding the O-Ring (bottom of the shaft) to tip of the sensor. Based on this, you can choose a sensor with this length. See drawing and table below.


All references are subject to change. Check at all times for the most recent part numbers.

Vehicles where the dashboard (or other vehicle functions) receives its data via the K-Line output of the tachograph cannot be converted to a DTCO 4.1. The K-Line communication has been phased out for some time and is no longer offered on current tachographs.


1. Find the right replacement tachograph and KITAS.

With the workshop configurator you will find the right replacement KITAS and DTCO - See below how to use the DTCO Catalog to find the right DTCO and KITAS.

  • DTCO:
    • Search by serial number : only possible after the DTCO 3.0.
    • Search by article numbers.
  • KITAS:
    • Search by serial number from 2012 onwards.
    • Search by article numbers .
  • Stoneridge:
    • Look at universal tachographs to find the right replacement in a more targeted way

The DTCO Catalog is available to everyone. On the WorkshopTab, the DTCO catalog tab is the extended workshop version. A link to the DTCO catalog can be found on the Workshop website at the top of the page under the link 'Tacho Catalogue':


The DTCO Catalogue can also be found here: https://tab.workshopreport.com/dtco-catalog/index

Create order lists based on your customers' upcoming calibrations

If you are a registered VDO workshop, you can plan ahead by exporting order lists. Access to the workshopreport server can be done via the VDO Hub.

Don't have access to the VDO Hub yet?

Then first register here (after registration, the link below also gives access to the VDO Hub login page)


After that, you have to log in once in each application that requires a password. After this has been completed, you can immediately access the available applications via the VDO Hub.

VDO Hub Dashboard

You'll then have direct access to:

  • DTCO Online FAQ
  • WorkshopTab configuration overview
  • Workshop Report
  • DTCO catalogue (for the correct serial and article numbers)
  • Sealbase (for seal registration)

Read the Service Information below on how to retrieve the retrofit data from the Workshop Report. The Workshop Report contains all vehicle calibrations that your workshop has carried out and all upcoming calibrations. With the latter, you can plan ahead and order the right parts in advance.


2. Equipment and (optional) materials required for the retrofit

Overview of universal DTCO 4.1 tachographs, KITAS 4 sensors, Retrofit equipment and external CAN connections.

Choose from the list below:

VDO has 4 universal variants. Three of these variants can be supplied as a Retrofit Kit, which includes the DSRC antenna and cable. This is mainly intended for vehicles that are still equipped with an analogue or Annex 1B digital tachograph, or where a competitor tachograph is being replaced.

Quick selection

Two criteria determine which replacement tachograph you need:

  • ADR Zone: Non-ADR / ADR Z2 or ADR Z1
  • Final resistance: with terminal resistance (R=120Ω (2x60Ω)) or without terminal resistance (R=0 Ω)
  • Stoneridge: Check the End Resistance Setting:
    • [Settings] [Parameters] [A4&A8 Term] = OFF, then without Terminal Resistor (R=0 Ω)
    • [Settings] [Parameters] [A4&A8 Term] = ON, then with Terminal Resistance (R=120 Ω)

If you have this information at hand, the replacement choice should be known. If not, it must be investigated to what tachograph is required. All universal tachographs are suitable for both 12V (Bridge Pin A5 – A6 mandatory) and 24V vehicles.

Universal Tachograph

1381-7550333013


1381-7550333014


1381-4550332018


1381-4550332019

Part Number

AAA2359680021


AAA2359690021


AAA2359710021


AAA2359700021

Retrofit Kit Part Number

2910003214600


2910003214700


2910003214800


(no kit available)

Zone

Z2


Z2


Z1


Z1

Volt

12/24V


12/24V


12/24V


12/24V

Baudrate(s)

125kBd / 250kBd / 500kBd


125kBd / 250kBd / 500kBd


125kBd / 250kBd / 500kBd


125kBd / 250kBd / 500kBd

CAN-Resistor

R=120Ω (2x60Ω)


R=0Ω
R= 2x 1,3k Ω


R=120Ω (2x60Ω)


R=0Ω

Find the right variant for the retrofit:

The law stipulates that when replacing the tachograph, the KITAS sensor must also be replaced. With the help of the VDO Configurator, the right KITAS replacement can be requested.

  • Mechanical KITAS sensors cannot be converted to smart KITAS 4 sensors.
  • The KITAS (item) type number can be used at any time to search for the replacement. Find it with VDO Configurator.
  • The KITAS serial number is also on the technical PCB, only for KITAS from 2012 onwards. Find it with the workshop DTCO catalogue.
  • If there are no references, use size L (see below) to find the right KITAS.


VDO Configurator/Catalogue - find your replacement KITAS

Replacement (valid) KITAS sensors can be found via the VDO Configurator (also via serial number from 2012). If you can't find the KITAS here, go to the 'Kitas Unknown' section below.

KITAS Unknown

If it is not known which KITAS the vehicle is equipped with, it is important that you measure the shaft length. This is length L, excluding the O-Ring (bottom of shaft) to the top of the sensor. Based on this, you can choose a sensor with this length. See the drawing and table below.


All references are subject to change. Check at all times for the most recent part numbers.

Please see below the equipment required for the tachograph retrofit:

VDO Workshop Tab

The workshop tab must be equipped with software version 4.10.8 or higher. The licenses that are required are listed below.

VDO Workshoplink

The Workshoplink takes care of the communication between the tachograph and the WorkshopTab, which is necessary to read DTCO parameters and to be able to write them again.

DSRC Meter

The DSRC meter is required to test the (newly) installed DSRC antenna or DSRC module. The DSRC meter can be mounted on a VESA compatible bracket (1 measurement at 1 distance) or on a tripod (1 or 3 measurements at 1 distance)

If you have a DSRC receiver from another brand, it can also be used.

Required WorkshopTab Software Licenses

Article Number

Name

Description

2910000849600

Universal Programming

Being able to program universal tachographs and access to hardware specific parameters.
(Official name: DTCO 3.0 license)

2910002038400

Calibration Gen2 tachographs

To calibrate Gen2v1 smart tachographs
(Official name: DTCO 4.0 license)

2910002472600

Tachograph replacement base

Basis for tachograph replacement
(Official Name: License 4.4)

2910003031700

Tachograph replacement wizard

Step-by-step help on how to replace a tachograph
(Official Name: License 4.8)

2910003180100

Calibration Gen2v2 tachographs

To be able to calibrate the DTCO 4.1 after replacement.
(Official Name: License 4.9)

2910003247100

Tachograph cloning (FUP)

Flexible Universal Programming. To quickly clone tachographs.
(Official name: License 4.10)

Internal or external?

DTCO 4.1 - Internal DSRC Module

The DTCO 4.1 uses the internal DSRC module by default. In the standard configuration, a DSRC antenna is connected to the FAKRA connection on the back (see figure below).

It is also possible for the DTCO 4.1 to be configured to control an external DSRC module. In this case, the DSRC antenna must be disconnected from the Fakra connection.

Fig 1. DTCO uses the internal DSRC module by default. The DSRC antenna is connected to the back of the red Fakra terminal.

The following DSRC antennas and cables are available for the universal DTCO 4.1:

A3C1056220021 - DSRC Antenna
AAA2371330021 - DSRC antenna protective cover
2910002313000 - Cable 3 meters
2910002313100 - Cable 4 meter
2910002313200 - Cable 6 meter

External (Stoneridge) DSRC Modules

If a vehicle manufacturer uses an external DSRC module, it must be connected to the correct CAN connection on the tachograph. If it is decided to switch to the internal DSRC module of the DTCO 4.1, then an already installed external DSRC module must be disconnected from the vehicle CAN. This is to avoid CAN conflicts and duplicate DSRC messages.

The Right External DSRC Module

Gen2v1 External modules can only send 19 RTM messages. It is mandatory to program or install a Gen2v2 external DSRC module. From VDO WorkshopTab software version 4.11 it is also possible to program the external DSRC module. This Gen2v2 DSRC module can also be purchased separately. The correct Gen2v2 external DSRC modules are listed below. If it is not listed here (Note: a revision can be a higher number), then you probably still have a Gen2v1 module.

Version Revision Make Configuration
21 R07 MAN 0 Ω
22 R08 MAN 120 Ω
25 R08 SCANIA 500 kbps
26 R06 SCANIA 250 kbps
31 R04 MERCEDES 500 kbps
32 R04 MERCEDES 500 kbps
35 R04 DAF 24V, 250kbps, 120 Ω
11 R12 UNIVERSEEL 12V, 250kbps, 0 Ω
40 R07 UNIVERSEEL 24V, 250kbps, 120 Ω
41 R05 UNIVERSEEL 12V, 250kbps, 120 Ω

How is your DSRC Module kit delivered?

Depending on where the DSRC module kit is sourced from (OE or Universal CAN Kit) it can be supplied with an A-Can (often OE), C-Can or C2-CAN (Universal Stoneridge kit). Connect the external DSRC module to the correct CAN connectors according to the vehicle manufacturer's instructions and set the CAN port correctly during the DSRC retrofit procedure. Please note that C2-CAN is only available on Stoneridge Tachographs.

Don't confirm definitively until after testing

Temporarily attach the DSRC antenna or module to the desired location (light double-sided tape). It is recommended to make the final confirmation only after a successful test.

Please note!

If it is decided not to use an existing external DSRC module but the internal DSRC module (with external antenna), disconnect the external DSRC module from the vehicle CAN bus at all times. This is to prevent malfunctions and erroneous messages during the testing of the installation.

If an external DSRC module is not used but an external DSRC module, disconnect the external antenna from the Fakra socket as well.


3. Retrofit Procedures – Step by Step

Tachograph replacement procedures, DSRC module/antenna placement and test steps.


4. Retrofit Special Considerations

Some vehicle brands may require additional actions, or a Universal DTCO 4.1 reset if the wrong parameters were programmed.

Choose from the list below:

When to reset the universal DTCO?

  • A universal tachograph that has been programmed incorrectly must always be reset to the original factory settings before another file is written to the tachograph. Incorrectly programmed parameters remain in the tachograph when another file is written over (or with) it.
  • DTCO Reset cannot be used with OE tachographs.
  • Legal parameters are not overridden (if a vehicle is already calibrated, do not go to the tachograph replace menu after a VDO Reset, but only to the menu [TCO Parameters] [Universal Parameters] to program the new file in the tachograph. Universal vehicle files (and also applies to the Reset file) do not override legal parameters.


Procedure:

1. Reset Universal Tachograph to 'Factory Settings'

Go to the menu [TCO Parameters] - [Programming Universal DTCO]

From the files available for programming, choose the file from the drop-down menu 'VDO Reset' (1). This is then shown at the top (2).

Then program it into the tachograph (programs the tachograph back to universal factory settings) by pressing 'Transmit'(3).

2. Insert the correct file back into the tachograph

Stay in the current menu [TCO Parameters] [Programming Universal DTCO]

Select the appropriate vehicle file of the respective brand, where the file name consists of:

  • [1381.xxxxxxx] [Vehicle Type Description]

To choose the correct file, the following applies to the 1381 number. Check this, along with the description, to make sure the correct file has been chosen.

  • 1381.1xxxxxx: non-ADR file
  • 1381.2xxxxxx: ADR Zone 2 file
  • 1381.4xxxxxx: ADR Zone 1 file

In the example below, a non-ADR DAF vehicle parameter file is chosen:

Still programmed the wrong file?

Don't worry. Repeat the steps as described above:

Perform the VDO Reset first (always do this because old, possibly erroneous parameters will not disappear from the tachograph)

After that, program the right file

General

VDO does not supply non-ADR or Zone 2 tachographs to Scania. Only the VDO ADR Zone 1 tachographs are approved by them and may be installed in a Scania vehicle. Two Zone 1 tachographs are available. Check the Baud rate and end resistor on your Stoneridge tachograph to see which variant is required.

1381-4550332018 : Z1, 250kbaud, 120Ω (final resistor)

  • Article number AAA2359710021. It is also available as a kit with article number 2910003214800.
    (Indication: Mostly for Scania types R, P-Series)
  • Choose this variant if with replacement Stoneridge [Settings][Parameters][A4&A8 Term] = ON

1381-4550332019 : Z1. 500kbaud, 0Ω (final resistor)

  • Article number AAA2349700021. No kit is available for this configuration.
    (Indication: Mostly for Scania S, R-Series / Euro 6 models and later)
  • Choose this variant if the replacement Stoneridge has [Settings][Parameters][A4&A8 Term] = OFF

DTCO 4.1 Using the Universal Tachograph in a Scania

ADR Zone 1 vehicle: the DTCO 4.1 may be installed in the vehicle without restrictions

Non-ADR or ADR Zone 2 vehicle: the connected wiring from the vehicle to the DTCO must be configured according to ADR Zone 1!

What you need to know about ADR Zone 1 DTCO 4.1 tachographs

After ignition off, the tachograph display will turn off

After contact out, remote tachograph data download processes will end abruptly

Remaining driving times may be missing from the secondary display for Scania vehicles prior to 2017.
For activation of vehicles after 2017 see the bottom of this page.

DSRC Module or Antenna

Scania vehicles are typically equipped with external DSRC modules. When installing a universal DTCO 4.1, there are two possibilities:

  • Using the internal DSRC module (in the DTCO 4.1):
    • Install the antenna according to the DSRC Installation Wizard
    • Disconnect any external DSRC modules (from a Gen2v1 tachograph) from the vehicle CAN to avoid malfunctions.
  • Using an external DSRC module:
    • Check if this is the correct version
    • Depending on where you ordered a DSRC kit, check which CAN jack you received (CAN A, CAN C, C2 CAN). If necessary, convert it and check the CAN settings in the tachograph.


1. Find and record the tachograph item, hardware and software number

Find this information in the vehicle instrument cluster by navigating to the "ECU Information/TCO" menu. Write down all of these values.

2. Program the tachograph according to the Standard Universal Programming step-by-step plan

3. Program the item, hardware, and software parameters.

These can be found in the "TCO Parameters" under the drop-down function "►Scania"

Fill in the correct field with the correct values and press [Program]

4. Read and check the N-factor and driveshaft factor (PPR)

Check it on the current tachograph and program it into the universal tachograph if necessary.

5. Using ADR Zone1 tachograph in non-ADR vehicles (or ADR Zone 2 vehicles)

Pin B5 (Zone 1 activation) must be connected to 24V. If this is not the case, the tachograph's card slots, printer and CAN bus will be locked.

6. Activation of driving times on secondary display for SCANIA vehicles from 2017 onwards.

  • By default, the availability of the counters is not released for SCANIA's CAN bus.
  • This can be activated by activating the license with article number 2910002025700 in the license menu of the tachograph (no workshop equipment is required). This is available on request.
  • Once the license key has been entered, the counters will be available for the vehicle. If these are still not shown, the vehicle was not suitable for reading them. If you have any doubts about the year of manufacture/suitability, please consult your SCANIA dealer.

The MAN Mission Mode

After retrofitting to a Universal DTCO 4.1, the following can occur with MAN trucks:

  • After ignition off, the tachograph display goes out immediately (visible in workshop)
  • After ignition off, a remote download activity stops immediately (not visible in workshop)

If this happens, follow the procedure below to recover it.

Procedure

  1. Go to the menu [TCO Parameters] - [Tachograph Replacement]
  2. Choose the sub-menu 'Program universal parameters'
  3. From the files available for programming, choose the file under 'DTCO 4.1 Mission Modes'
  4. Select 'ALL OFF' and write these parameters to the vehicle.


Volvo/Renault Retrofit to DTCO 4.1 Universal (Chano parameters)

1. Chano Identification

1.1 Chano-identification when using Flexible Universal Programming (FUP)

If Flexible Universal Programming (the preferred method) is used, all relevant vehicle information, including the Chano identification number, is automatically included.

Note: It is currently possible that the Diagnostics port is turned off after the FUP. As a result, the vehicle cannot communicate with the tachograph. A solution for this will be found soon. Until then:

  • First reset the tachograph (remove the FUP parameters): see how to do this here
  • Reprogram with a standard universal file according to the standard programming method

1.2 Chano identification when using Standard Universal Programming

For the Volvo and Renault brands, with a TEA2+ architecture (Euro 6 and later), the Chano parameter (chassis number) is important. Older TEA2 (Euro 5 and older) vehicles do not have this parameter.

During the programming of these vehicles, the correct TEA2+ file must be selected.

With standard universal programming, a 'standard' Volvo/Renault configuration file is loaded. This cannot contain the chassis-specific value. Therefore, after standard universal programming has been completed, these parameters still need to be written into the tachograph.

  • Look up the Volvo/Renault Chano number. An example of this can be seen below
  • Look up the Volvo/Renault Serial No. This is the serial number of the "old" tachograph. Fill this in and omit all starting zeros (0) when filling in. An example of this can be seen below

1.2.1. Volvo/Renault Chano number

1.2.1.1. Renault T, K and C Series

The Chano number always starts with a "J" followed by the first 10 alphanumeric characters of the chassis number. In the example below, the Chano number of chassis number 30CS000054F is: J30CS000054.

So the "J" is at the front and the "F" at the end is dropped, as this is the 11th character from the chassis number.


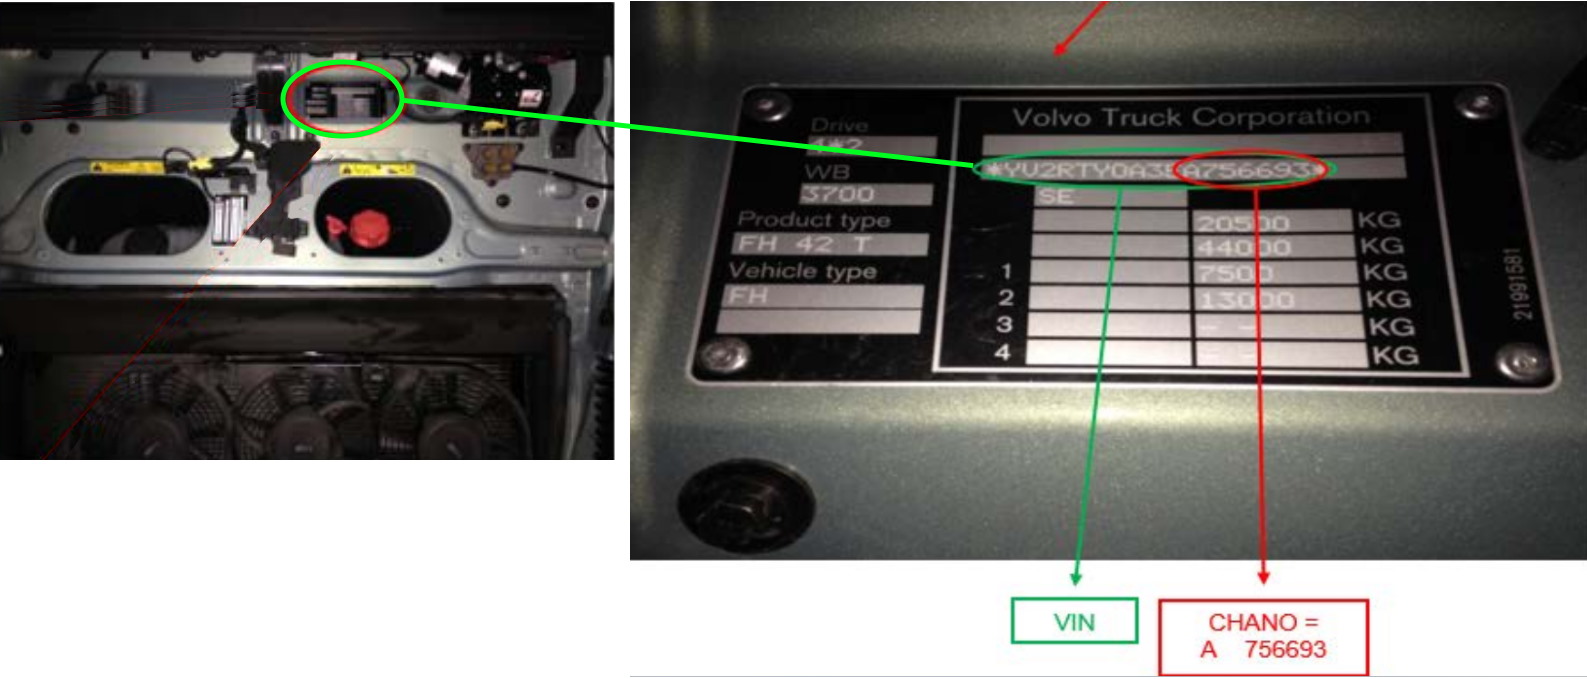
1.2.1.2. Volvo FH and FM series (TEA2+)

The Chano number to be programmed starts with an "A" followed by 4 spaces and the last 6 alphanumeric characters of the chassis number (after the A).

In the example below, the Chano identification of VIN number *YV2RTYOA3EA756696* is as follows: A 756696
(=A followed by 4 spaces and the last 6 alphanumeric characters (not the '*'). This is an example of a Volvo FH series truck.


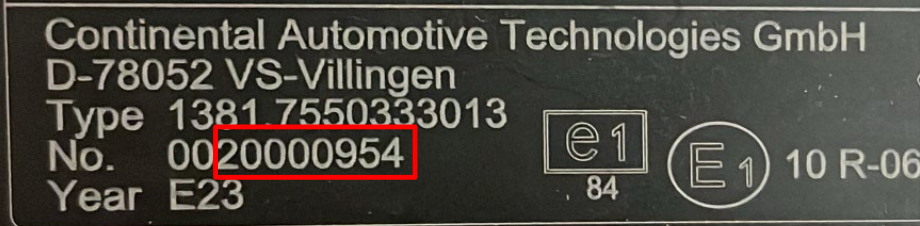
1.2.2. Volvo/Renault serial number

Without the initial zeros, write down the serial number of the tachograph to be replaced. See example below.

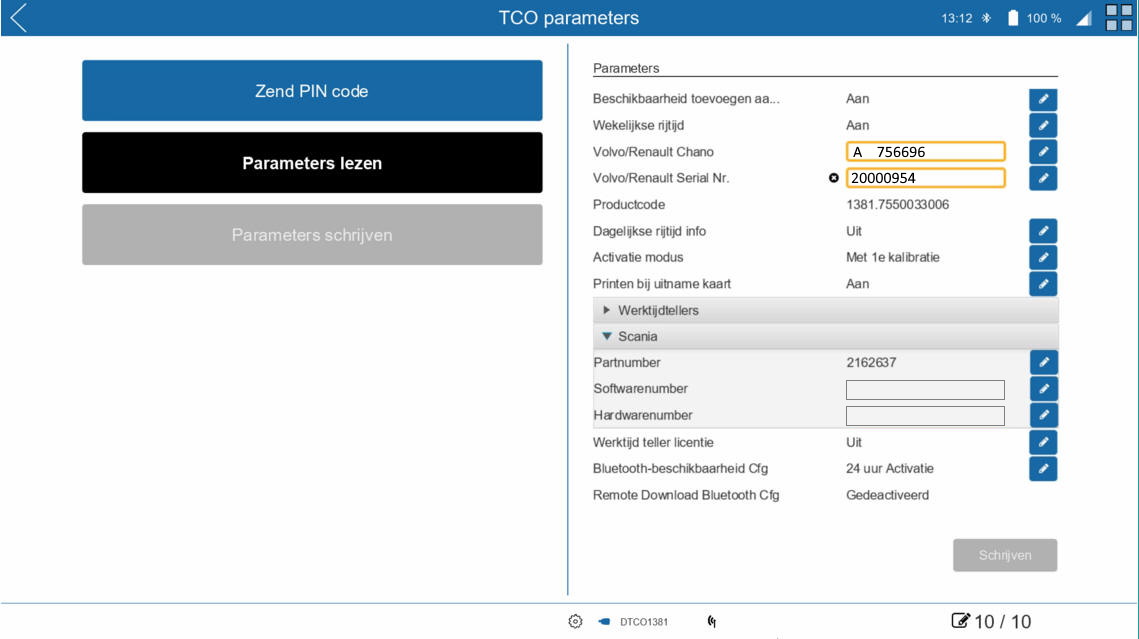
1.2.3. Programming the Chano and Serial Number

This function requires at least WST SW 4.10.8.

In the WorkshopTab, enter the found values (see 1.2.1 and 1.2.2) in the designated parameter fields in the menu [TCO Parameters][TCO Parameters]. Finish with "Write".

Note: It is possible that both Volvo and Renault, instead of the actual Chano number, the term 'VOLVO' should be written down. Try this if it turns out that the original chano number leads to recognition errors.

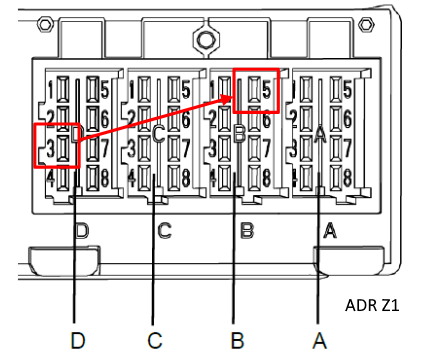
1.3. ADR Zone 1 and Zone 2 tachographs

1.3.1. ADR Zone 1

  • OE tachographs: Zone 1 activation is on Pin D3
  • Universal DTCO 4.1: Zone 1 activation is on Pin B5

Remove the connection to Pin D3 and place it on Pin B5

1.3.2. ADR Zone 2

ADR Zone 2 tachographs require a ground connection between pins A5 and A6. If necessary, it must still be connected to the external ground.


1.4. Vehicle Diagnostics

Due to all the innovations, the vehicle-specific diagnostics software may also need to be updated in order to be able to detect the new tachograph.

For all forms of retrofit, check the installation via the Volvo/Renault vehicle diagnostics computer.


5. Smart Tachograph Version 2 Manuals

The Retrofit is not only new for the workshop, the driver and Fleet also have to deal with the new tachographs.

Download free manuals here and hand these out to your customer.

Alternatively, email UK@VDO.com and enquire about free eLearning courses that are available to go through all the new features and operations of the DTCO 4.1.


Become a VDO partner workshop now

Benefit from the high demand for EU Mobility Package 1-compliant retrofitting: Contact us now to succeed with VDO, the manufacturer of the best-selling digital tachographs. We look forward to welcoming you and your team!

Fields marked with * are mandatory.

Kontaktieren Sie uns

Sie haben Fragen? Wir helfen gerne!